What’s in a Name?

It should come as no surprise that I like words. I like to look them up in the dictionary, thesaurus and my bible concordance. I like to know what they mean and where they originated and how the original language differs from subsequent translations. Words excite me.

Names are really just words, too. Only names are even more fascinating because they can identify family heritage and describe a person’s character. Think of all the different titles you might use to describe yourself….mother, sister, daughter, friend, teacher, artist, chef, Christian, Army Wife. What do they say about you? Proverbs tells us that “A good name is rather to be chosen that great riches. “ Proverbs 22:1 Our character sometimes determines the names we might be called. Our names categorize us with other like people and we either intentionally or unintentionally become representatives of that group. So not only should we want to choose a good name for ourselves, we should also strive to be worthy ambassadors for any group or family by whose name we are called.

In the bible, Jesus is referred to by over 200 different names. Those names reflect His nature, His position as part of the trinity, and the work He has done and will do. He is the Servant, the Son of God and the Sacrifice. He is the Light of the World, The Son of Man and the Redeemer. He is Lord, Immanuel, and our Indescribable Gift. According to Revelation, there is still a name for Jesus we won’t learn until He comes again. John describes his vision of Christ on a white horse and tells us that, “He also has a name written that no one knew except Himself.” Revelation 19:12 No matter how we strive to know all we can about His character, the depths of His wisdom and love for us will remain a mystery until we see Him face to face.

It is by His name alone we are saved and it is His name we are to exalt and place our trust in above all others.


Nor is there salvation in any other, for there is no other name under heaven given among men by which we must be saved. Acts 4:12

Oh magnify the Lord with me and let us exalt His name together. Psalm 34:3

And those who know your name will put their trust in You. Psalm 9:10

I have been searching for an advent calendar that really spoke to me for several years. Something more meaningful than the little windows with chocolates, but I’ve been unsuccessful until a couple of weeks ago. Searching on line, I had seen several formats for the names of Jesus advent projects – ornaments, strips of paper and chains or bags with small gifts in them representing the different names from the very talented ladies at My Growing Home and I Am Momma Hear Me Roar. Then I was struck by some inspiration to make an open backed frame to hang on the wall with numbered cards for each day on one side and different names for Jesus and their bible reference on the opposite side. So, each day in advent you would reveal another name and learn a little more about the Alpha and Omega.Advent Calendar

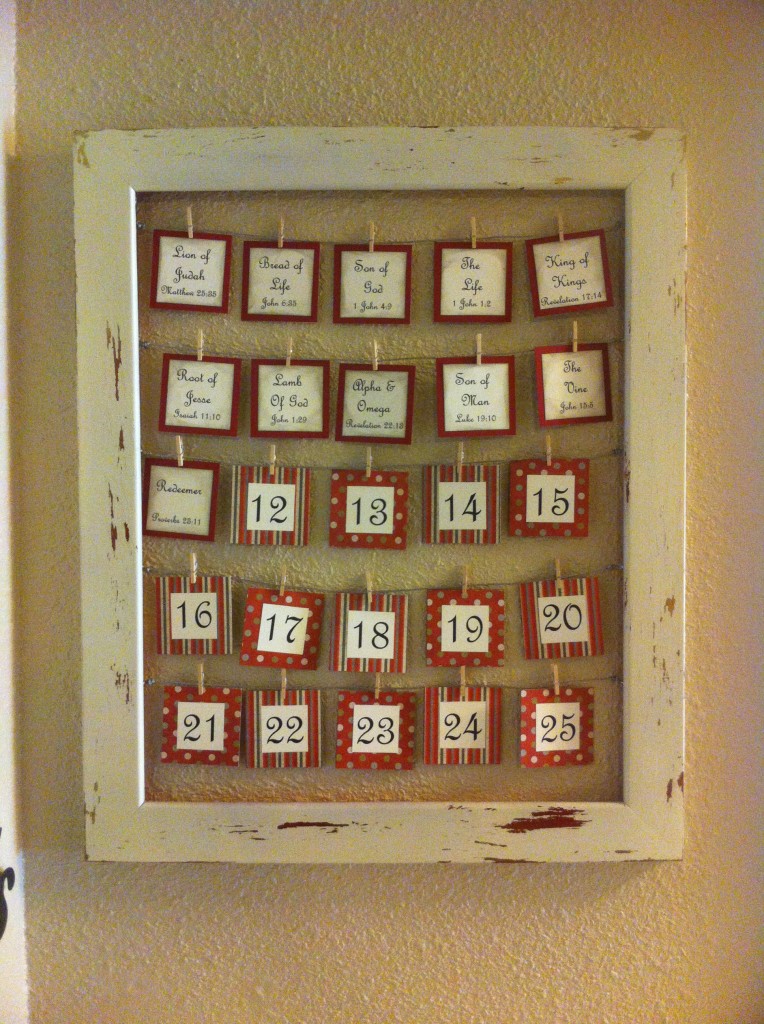
Combining my crafting skills and my power point skills, I turned it into a workshop at My Messy Desk last Wednesday I had 15 ladies here making their own advent calendars. And a handful who wanted a take away kit so they could make theirs at home. 20 or more ladies interested in learning more about the King of Kings with their families this advent. What an amazing blessing!

Since this was such a popular craft, I decided to offer the tutorial and the power point presentation that make this project easy to duplicate for any of my friends around the globe as an instant download file on ETSY. I hope you will visit my shop and consider taking time to create this heirloom keepsake for your family.

For whoever calls on the name of the Lord shall be saved. Romans 10:13

FANtastic Wreath

IMG_3607A friend of mine pinned an awesome wreath she found for sale by 1BabyToes1 on Etsy for $45 to one of my Pinterest boards, hoping that we could make it together. To be honest, I put her off for several weeks because I was scared to drill a hole in a baseball… I had visions of it flying off the workbench across the garage and shattering something! All my anxiety was unfounded, because it turns out, it was harder to bend the wire hanger closed than to do the drilling. For those of you who have baseball teams still in the running for the World Series, this might make a super nice gift for your hubby, or something you can do together if he is particular about his power tools. As an added bonus, you can buy all the supplies locally.. yes, even in Leesville!

IMG_3598 IMG_3597

What you need:

11 baseballs

1 wire hanger

1 foot of thin ribbon in your team’s colors

1 yard of thick ribbon in your team’s colors (or burlap ribbon like we used)

1 wooden letter to represent your team name (other fonts available on-line and at craft stores)

Acrylic Craft paint in your team’s colors

Acrylic Spray Sealant (any brand will do)

Hot glue

2 pairs of heavy duty pliers

Electric drill with ½ inch drill bit

Scrap wood

Safety Goggles

Paint the letter in your desired color scheme. I recommend doing both front and back and using at least two coats of paint. For dying the front side, you can stick the tall thumb tacks into the back side to elevate the letter and minimize any lumpy paint along the edges. Once dry, spray with the sealer following manufacturer’s directions. Apply at least two coats, drying completely in between applications.

IMG_3604

Wearing your safety goggles, hold the baseball down firmly against the scrap lumber, with your hand shaped like a ‘c’. Starting slowly, push the drill straight down into the ball, until you get the feel of it.. Use an up and down motion to pull some of the cork out of the hole you are creating, or the drill will get bogged down. You will feel a change in pressure when the drill goes out the other side and into the wood. You’ll see, it is so much fun; you might want to do more than just 11, but restrain yourself because if you use more than 11 balls, the wreath will be too big to hold its shape.

IMG_3596

Straighten out a wire hanger and thread the balls on to it. You will probably want to do this part in the garage, as there will be a decent amount of cork that comes out during this step as well. Once all the balls are on the wire, twist the wire closed. This does not need to be pretty, but I do recommend getting any sharp edges tucked in and / or snipped off. You want to get the balls as close together as you can. Using at least one pair of pliers is helpful here.

IMG_3606

With the wide ribbon or burlap, make a bow, going around the twisted ends of the hanger. You can ruffle the long ends of the bow by tucking them between the balls and hot gluing when you get it how you want it.

Finally, depending on the letter used to represent your team, you can make a loop with the thin ribbon to hang the letter from the large bow (as we did with the “C” for Cubs… now you know why I’m not overly excited for the World Series). With some letters that don’t have a closed top (W, H, I, J, K, etc…) however, it will be necessary to glue the loose ends to the back side of the letter, after the ribbon through the large bow.

IMG_3607


Beads, Baubles and Bling

You might not expect that a girl who uses the idea of a messy desk as an ad campaign for a place you should come to craft, would have a problem with that mess, but even I have to draw the line somewhere. I went to a Fort Polk Spouses Club Craft Group get together last Monday and took along most of my jewelry making stash. Our theme was

Before…

“Upcycle Your Jewels.” I don’t usually mind the disarray that is my bead (dis)organization, but I was a little embarrassed that day because I had broken pieces, couldn’t find a thing in the cases, and wasn’t even entirely sure what I had in there.


I think part of the reason I have embraced the idea of a mess, is that because I think I have some tendencies toward OCD and I’m just terrified that once I start cleaning up the clutter, I won’t be able to stop myself. And I was right. But what else does an Army Wife whose hubby has been in the field for over a week have to do?

Starting to look a little better

Beads and findings have been scattered all around my craft room for going on three days now. I have been sorting and organizing and re-organizing them until visions of beads, baubles and bling dance in my head all night long. My boys have been banned from the

Who let the dog in here?

area. I should have banned the dog, because she bounded through yesterday morning and flipped two cases of already sorted beads, turning their contents into confetti on the floor and eliciting some not so pleasant sounds from my mouth.

I believe God gives us what we need, not necessarily what we want. I would not have had time to devote to this task, if anybody came to my first Craft Day last week. Of course I wanted ladies to come, but this has given me great opportunity to make My Messy Desk just a little more organized. I have been praying for more patience, but I would not have expected that lesson to come following a shower of beads raining down on the (thankfully carpeted) craft room floor. Where there was disappointment, God has given me blessings.

I even learned that a spoon makes a fantastic tool for getting seed beads up from the carpet, but you have to use just the right angle and the perfect amount of pressure, or it is like Mardi Gras…beads flying everywhere!

I had just about finished with the beads and started on the findings when my 3-time veteran husband surprised me with a brief visit…even he was afraid to walk through the beaded battle ground without combat boots on his feet!

I am thrilled to be finished with this task, but every piece is so strategically placed that if I buy one more strand, I will probably have to start all over again! For now, though, I can say that when my ladies come for Etching and Earrings on Friday, they will actually be able to find what they are looking for!

Cutting Glass

An actual craft blog!! Written when we didn’t have access to internet here!


I will be the first to admit I am a Pinterest hoarder. I have hundreds of pins, literally. 189 on my “What can I make today?” board alone. I’ve done a few of the things I’ve pinned, but honestly, most of them are waiting for when I have more time. Well, right now while we are waiting for our house hold goods to arrive here in Louisiana, we have lots of time with little to do and the afternoons are just too hot to be outside for very long. So, I thought I would actually DO something I had pinned. I even thought my boys would enjoy it, particularly because it involved fire. I’ve been intrigued by (and a little skeptical of) the many tutorials posted for “How to cut glass with fingernail polish remover and yarn.”

So, today on our 5th trip to Walmart since we arrived here less than two weeks ago, I picked up some yarn on clearance and sand paper. After lunch, I gathered the items I would need.

But, I couldn’t find any scissors to cut my yarn. I had to improvise and burn through it to cut the lengths to wrap around the bottle. I don’t know what kind of crafter travels with a lighter and not scissors, but that’s me. I’ve been a little miffed that the recycling program here doesn’t include glass, so there will be no shortage of bottles on which to perfect my technique, I’m sure. Perhaps I will even provide an avenue to ease someone else’s’ guilty conscience by allowing them to bring me their bottles…but that is another story. I didn’t pack any safety goggles, either, so my helpers and I wore our sun glasses, just in case there was a stray shard of glass that went flying.

It really was just as easy as the other instructions made it out to be. Most of the tutorials were pretty much the same, but I used the one from Little Green Bow, who incidentally has lots of other awesome stuff. Tie the string tightly around the bottle where you want the cut to be and trim the ends of yarn (which yes, I did by burning since I don’t have any scissors yet). Lift the yarn off the bottle and soak in the finger nail polish, keeping the circular shape. Replace the string. Wipe off any excess fingernail polish so that the only part that will burn is the yarn (which doesn’t actually burn, just the finger nail polish burns). Light the yarn on fire and rotate the bottle as it burns. I counted to about thirty and then dunked the bottle in the cold water. To my utter amazement, it worked! The two pieces popped right apart. Some tutorials suggest twisting as you dunk, but I didn’t even need to do that. I was also surprised that the edges weren’t really sharp, but sanded them just in case.

My two cents worth on the process:

1) Keep the string in the round shape when you take it off the bottle and put it in the nail polish remover. This way you can just slide it back down over the top of the bottle. If it takes too long to get it reshaped, the nail polish remover evaporates and it won’t burn long enough to produce the heat needed for expansion.

2) Get the string as straight around the bottle as you can. I’m not sure, but it seems like places where it was uneven were where the glass cracked.

3) Make sure the water is really cold…we live in Louisiana, so I put some ice in it just to be sure.

I think I will be making a lot of these while we are here. Perhaps I will make use of some of the other ideas I have pinned to embellish them…wrapping in twine, stenciling and painting, writing a word or design in hot glue and painting The first few I do I plan to put some sand in the bottom with a candle for our excellent screened in porch, where I plan to spend every cool evening we have making more empty bottles to experiment with…just as soon as soon as the mercury drops.